
Spring Blossom Beauty: Cherry Blossom Nail Art
As the warm breeze of spring begins to fill the air, it’s time to infuse some blooming beauty into your Nail Design. What better way to celebrate the season of renewal than with a stunning cherry blossom nail art? This unique and captivating design will bring the essence of spring right to your fingertips, adding a touch of elegance and charm to your overall look.
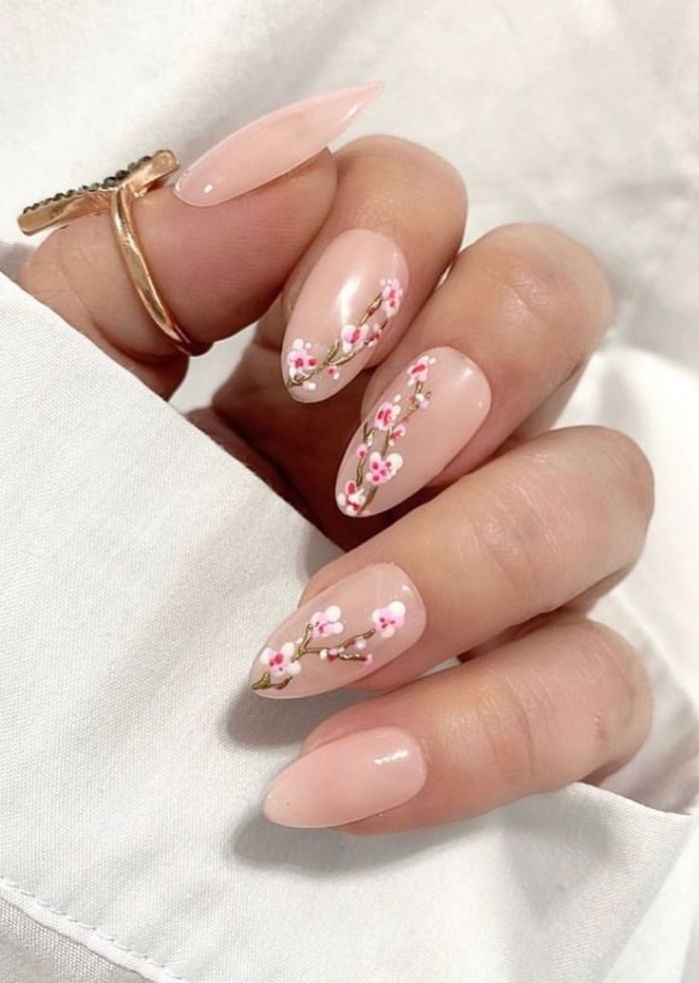
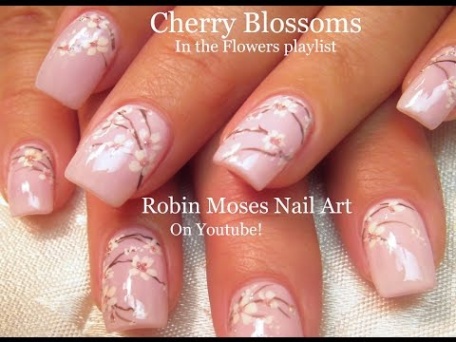
Image Source: pinimg.com
Cherry blossom nail art is a fun and creative way to express your love for nature and all things beautiful. The delicate pink petals and whimsical branches of the cherry blossom tree make for an enchanting design that is sure to turn heads wherever you go. Whether you’re heading to a garden party, a wedding, or simply want to add a touch of springtime flair to your everyday look, cherry blossom nail art is the perfect choice.
To create this stunning nail design, start by choosing a soft pink or nude base color for your nails. This will serve as the perfect backdrop for the cherry blossom design to truly pop. Once your base color is dry, it’s time to get creative with your cherry blossom design.
Image Source: ytimg.com
Using a fine nail art brush or a thin nail polish brush, carefully paint delicate cherry blossom branches on each nail. These branches should be thin and wispy, resembling the natural flow of a cherry blossom tree. Next, add small pink dots to represent the blossoms themselves. You can also add a touch of white or light pink to create depth and dimension to your design.
For an extra pop of color and sparkle, consider adding a touch of glitter or rhinestones to your cherry blossom nail art. This will give your design an extra touch of glamour and make your nails truly stand out.
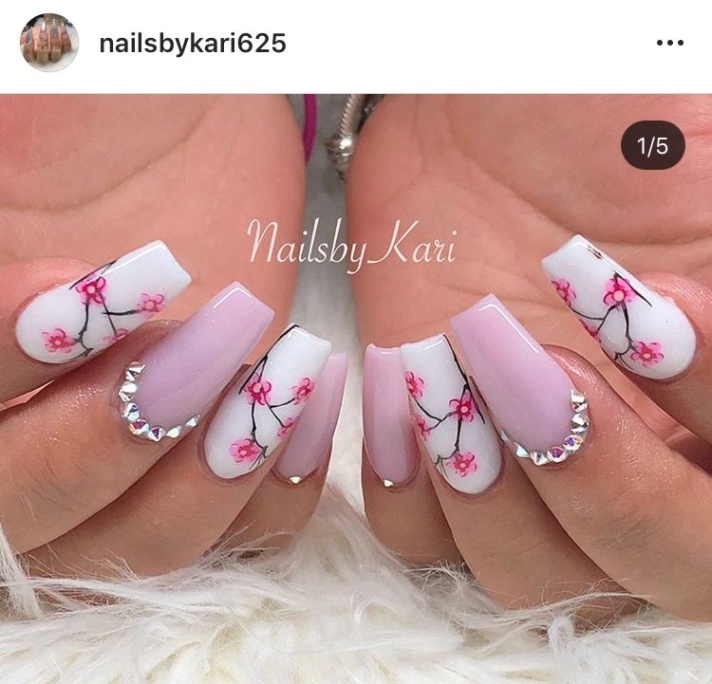
Image Source: chantalscorner.ca
When your cherry blossom nail art is complete, finish off with a top coat to seal in your design and add shine and longevity to your manicure. This will help your nail art last longer and stay looking fresh and beautiful for days to come.
Whether you’re a nail art enthusiast or simply looking to add a touch of springtime beauty to your look, cherry blossom nail art is the perfect choice. This unique and captivating design will bring a touch of nature and elegance to your fingertips, making you feel like a blooming beauty all season long.
Image Source: pinimg.com
So why not embrace the beauty of spring with a stunning cherry blossom nail art design? Let your nails bloom with the delicate petals and whimsical branches of the cherry blossom tree, and watch as your fingertips transform into a work of art that celebrates the magic of the season.
Nail Magic: Transforming Tips with Cherry Blooms
Spring is the season of renewal, growth, and blossoming beauty. And what better way to embrace the spirit of spring than by adorning your nails with the delicate and enchanting cherry blossoms? Nail art has become a popular form of self-expression and creativity, allowing individuals to showcase their unique style and personality. And with the cherry blossom trend taking the beauty world by storm, there are endless opportunities to create stunning Nail Designs that capture the essence of this magical season.
Cherry blossoms, also known as sakura in Japan, are symbolic of renewal and the fleeting nature of life. Their ethereal beauty and delicate petals have inspired artists, poets, and now nail technicians to create intricate and captivating designs that celebrate the beauty of nature. By incorporating cherry blossoms into your nail art, you can transform your tips into a mesmerizing work of art that captures the essence of springtime.
To achieve the perfect cherry blossom nail design, start by selecting a soft and feminine color palette. Pale pinks, soft whites, and muted greens are ideal choices for creating a delicate and ethereal look. Consider using pastel nail polishes in these shades to create a soft and dreamy base for your cherry blossom design.
Next, gather your tools and materials, including a fine-tipped nail art brush, dotting tools, and a selection of nail polishes in various shades. To create the cherry blossoms, dip your nail art brush into a pale pink polish and carefully paint small, five-petal flowers onto your nails. Use a light touch and gentle strokes to create the delicate and airy petals that are characteristic of cherry blossoms.
Once you have painted the cherry blossoms onto your nails, use a smaller nail art brush or dotting tool to add details such as the center of the flowers and any additional accents. Consider adding small dots of white or yellow polish to mimic the stamens of the cherry blossoms, or create a subtle ombre effect by blending different shades of pink together.
To complete your cherry blossom nail art design, add a layer of clear top coat to seal in the design and add a glossy finish. This will help protect your nail art and ensure that it lasts longer without chipping or fading. You can also add additional embellishments such as glitter, rhinestones, or metallic accents to further enhance the beauty of your cherry blossom nails.
Cherry blossom nail art is a versatile and customizable design that can be adapted to suit any style or occasion. Whether you prefer a subtle and understated look or a bold and dramatic statement, cherry blossoms can be incorporated into your nail art in a variety of ways. Consider creating a full set of cherry blossom nails, or add a single accent nail with a cherry blossom design for a touch of whimsy and charm.
Incorporating cherry blossoms into your nail art is a fun and creative way to celebrate the beauty of spring and add a touch of nature-inspired magic to your fingertips. Whether you are a seasoned nail art enthusiast or a beginner looking to try something new, cherry blossom nail art is a captivating and enchanting design that is sure to turn heads and spark joy wherever you go. So why not embrace the beauty of the cherry blossoms and transform your tips with a touch of nail magic this spring?
Blooming Nails: Unique Cherry Blossom Design
Spring is finally here, and what better way to celebrate the season of renewal and growth than with a fresh and unique cherry blossom Nail Design? Cherry blossoms, or sakura as they are known in Japan, are a symbol of beauty, renewal, and the fleeting nature of life. They bloom for just a short period of time before falling to the ground, reminding us to appreciate the beauty in each moment.
Creating a cherry blossom nail design is a fun and creative way to bring a little bit of this beauty into your everyday life. Whether you’re a nail art novice or a seasoned pro, this design is sure to impress. With a few simple tools and a little bit of patience, you can create a stunning manicure that will have everyone asking where you got your nails done.
To start, gather your supplies. You’ll need a base coat, a pale pink nail polish for the base color, a white nail polish for the blossoms, a thin nail art brush or toothpick, and a top coat to seal in your design. Begin by applying a base coat to protect your nails and allow for a smooth application of polish.
Next, apply two coats of pale pink nail polish to all of your nails. This will serve as the background for your cherry blossom design. Once the pink polish is completely dry, it’s time to start creating your blossoms.
Using a thin nail art brush or toothpick dipped in white nail polish, carefully create small dots on your nails to represent the blossoms. Start at the tip of your nail and work your way towards the cuticle, creating a gradient effect. You can vary the size and placement of the dots to create a more natural and organic look.
Once you’ve created your blossoms, you can add some additional details to really make them pop. You can use a darker pink or red polish to add some depth and dimension to the flowers, or add some green leaves to complete the look. Get creative and experiment with different colors and shapes to make your design truly unique.
Finish off your cherry blossom design with a generous coat of top coat to seal in your design and add shine. This will help your manicure last longer and prevent your design from chipping or fading.
Not only is a cherry blossom nail design beautiful and unique, but it also carries a deeper meaning. The fleeting nature of the cherry blossoms reminds us to appreciate the beauty in each moment and to cherish the time we have. Every time you look down at your nails, you’ll be reminded to stop and smell the flowers, so to speak.
So why not treat yourself to a blooming nail design this spring? Whether you’re a fan of delicate and dainty designs or bold and vibrant looks, there’s a cherry blossom design out there for everyone. So grab your nail polish and get creative – your nails will thank you for it!
Floral Fingers: How to Nail Cherry Blossom Manicure
As the spring season approaches, it’s time to say goodbye to dark and moody nail colors and hello to bright and cheerful hues. One of the most popular nail trends for spring is cherry blossom manicure, a delicate and feminine design that is perfect for welcoming the warmer weather.
To achieve the perfect cherry blossom manicure, you’ll need a few key tools and a bit of patience. Start by choosing a light pink or nude base color for your nails. This will serve as the background for your cherry blossom design and will help the delicate flowers to stand out.
Next, you’ll need a thin nail art brush or a toothpick to create the cherry blossom flowers. Dip the brush or toothpick into a light pink polish and carefully create five small dots in a circle shape on your nail. These dots will serve as the petals of the cherry blossom flower.
Once you have created the petals, use a darker pink or red polish to add a small dot in the center of the flower to represent the stamen. You can also add some green polish to create leaves and branches for a more realistic cherry blossom design.
If you’re feeling extra creative, you can also add some glitter or rhinestones to your cherry blossom design to give it a touch of sparkle and glamour. Just make sure to seal the design with a top coat to protect it and make it last longer.
Cherry blossom manicures are a fun and easy way to add a touch of spring to your look. Whether you’re heading to a spring picnic or a garden party, your floral fingers will surely make a statement and have everyone asking where you got your nails done.
So why not give this cherry blossom manicure a try and nail the perfect spring look? With a bit of practice and some creativity, you’ll be able to create a stunning floral design that will have everyone blooming with envy.
cherry blossom nail design